Transforming humble scallops into a culinary masterpiece is not reserved for professional chefs. With a few key techniques, you can achieve restaurant-quality seared scallops recipe right in your own kitchen. The secret to that irresistible golden-brown crust and tender, buttery interior lies in two fundamental principles: ensuring your scallops are bone-dry and searing them in a fiercely hot pan. Forget the fear of rubbery seafood; prepare to unlock the true potential of these delicate treasures of the sea.
A plate of perfectly seared scallops feels indulgent and sophisticated, making them ideal for special occasions or an elegant weeknight meal. Their naturally sweet, briny flavor requires minimal embellishment, allowing their exquisite taste to shine. This comprehensive guide will walk you through every step, from selecting the best scallops to mastering the flip, ensuring your next scallop dish is nothing short of spectacular.
The Foundation of Flavor: Choosing and Preparing Your Scallops
The journey to perfect seared scallops begins long before they hit the pan. Thoughtful selection and meticulous preparation are paramount.
Selecting the Best Scallops
- "Dry" Scallops vs. "Wet" Scallops: This is arguably the most crucial decision. "Dry" scallops are natural, untreated scallops, often creamier in color. "Wet" scallops, on the other hand, have been treated with a phosphate solution (STP) to preserve them, causing them to absorb water. While often cheaper, this added moisture makes it incredibly difficult to achieve a good sear, as they tend to steam rather than caramelize. Always opt for "dry" scallops if available; they are worth the investment for superior results.
- Size Matters: Sea scallops (the larger variety) are generally preferred for searing due to their substantial size, which allows for a beautiful crust while maintaining a tender center. They are often sold by count per pound (e.g., 10/20 count means 10 to 20 scallops per pound).
- Freshness: Look for scallops that smell sweet, like the ocean, not fishy. They should be firm to the touch.
Prepping for Perfection: Cleaning and Drying
Once you have your pristine scallops, a little prep work goes a long way:
- Remove the Side Muscle: Most scallops purchased from the grocery store or fish market will already be shucked. However, each scallop typically has a small, tough, crescent-shaped muscle attached to its side. This muscle, noticeably firmer and lighter in color than the rest of the scallop, should be gently peeled off and discarded. If left on, it will become rubbery and unpleasant when cooked, detracting from the otherwise tender bite.
- The Golden Rule: Pat Them DRY! This step cannot be overstated. Even "dry" scallops will have surface moisture. Using several layers of paper towels, thoroughly blot each scallop until its surface feels completely dry. You can even let them sit on a wire rack over a baking sheet in the refrigerator for 15-30 minutes for extra insurance. Why is this so important? Moisture on the surface of the scallop creates steam when it hits the hot pan. Steam lowers the pan's temperature and prevents the Maillard reaction (the chemical process responsible for that delicious browning and complex flavor development) from occurring. Instead of a glorious crust, you'll end up with gray, rubbery scallops.
- Season Simply: With their inherent delicate flavor, scallops don't need much. A generous sprinkle of sea salt and freshly ground black pepper on both sides is usually sufficient. A squeeze of fresh lemon juice on one side can also complement their brininess beautifully. Season right before cooking, not too far in advance, as salt can draw out moisture.
Mastering the Heat: Your Pan and Oil Selection
With your scallops prepped, it's time to set the stage for searing success. The right equipment makes all the difference.
Choosing the Right Pan
The type of pan you use directly impacts the quality of your sear:
- Stainless Steel Frying Pan: This is an excellent choice. Stainless steel heats evenly and can withstand the high temperatures needed for searing, allowing for superb caramelization.
- Well-Seasoned Cast-Iron Skillet: Another fantastic option. Cast iron retains heat exceptionally well, providing a consistent, intense cooking surface that contributes to a beautiful, deep crust.
- Avoid Non-Stick Pans: While convenient for many dishes, non-stick pans are generally not suitable for searing scallops. Their coatings are often not designed for the high heat required, which can damage the pan and release unwanted chemicals. More importantly, the non-stick surface can inhibit the deep browning and caramelization that defines a perfect sear.
The Best Oil for Searing Scallops
Because you'll be cooking at high temperatures, selecting an oil with a high smoke point is essential to prevent burnt flavors and excessive smoke.
- Recommended Oils: Vegetable oil, canola oil, grapeseed oil, or avocado oil are all excellent choices. They can handle intense heat without breaking down.
- When to Use Butter: While butter adds incredible flavor, its low smoke point makes it prone to burning at searing temperatures. The best approach is to use a high-smoke-point oil for the initial sear, and then add a teaspoon of unsalted butter to the pan during the final minute of cooking, allowing it to foam and baste the scallops with its rich flavor.
- Olive Oil for Finishing: Extra virgin olive oil has a lower smoke point and delicate aromatics that are best preserved by using it as a finishing drizzle over the cooked scallops, rather than for the initial high-heat sear.
The Searing Technique: Precision and Patience
This is where the magic happens. Achieving that restaurant-quality crust requires attention to detail and a commitment to not disturbing your scallops.
Achieving a Screaming Hot Pan
Place your chosen skillet over medium-high to high heat. Add just enough high-smoke-point oil to thinly coat the bottom of the pan – about 1 tablespoon for 12 scallops. Heat the oil until it shimmers and just begins to smoke faintly. This intense heat is critical for instantly creating a crust when the scallops make contact.
The Art of the Sear
- Place Scallops Carefully: Using tongs, place the seasoned scallops into the hot pan, making sure to lay them seasoned-side down. Crucially, do not overcrowd the pan. Overcrowding lowers the pan's temperature, leading to steaming instead of searing. Cook in batches if necessary, allowing ample space between each scallop.
- Resist the Urge to Move Them: Once the scallops are in the pan, do not touch them. Let them cook undisturbed for 2 to 3 minutes, depending on their size. This undisturbed cooking time is essential for developing that deep, golden-brown crust. If you try to move them too soon, they will stick to the pan, tearing off the precious crust you're trying to build. The scallop will naturally release from the pan once the crust is fully formed.
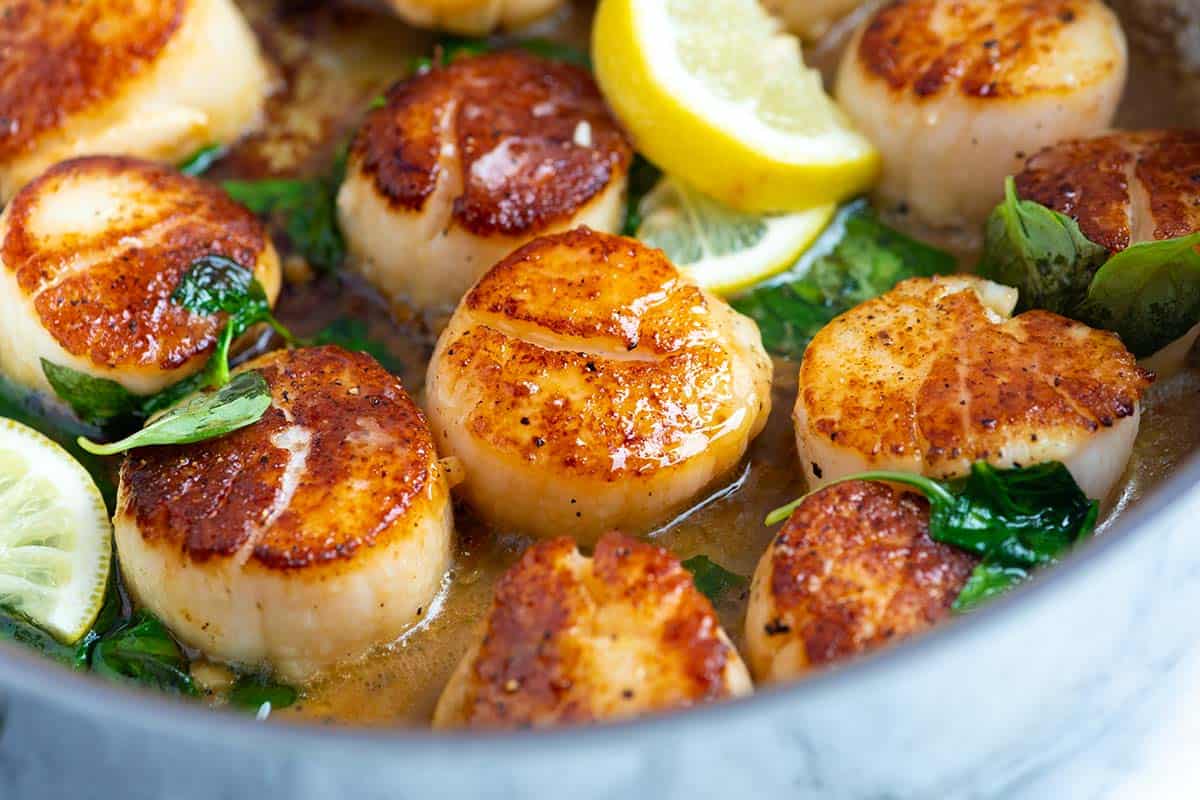
- Check for Doneness and Flip: After 2-3 minutes, gently lift one scallop with tongs. It should have a beautiful, deep golden-brown crust that easily detaches from the pan. If not, continue cooking for another 30 seconds to a minute. Once a perfect crust is achieved, flip all the scallops to the other side.
- Add Butter and Finish Cooking: At this point, you can add a teaspoon of butter to the pan. Allow it to melt and baste the scallops as they cook. Continue to sear for another 1 to 2 minutes, again without moving them. The exact cooking time will depend on the size of your scallops; a 10/20 count scallop might need 3 minutes on the first side and 1-2 minutes on the second. The scallops should be opaque throughout, with a slightly translucent center remaining for optimal tenderness.
- Remove Immediately: As soon as the scallops are cooked to your desired doneness, remove them from the pan. Overcooking will quickly turn them tough and rubbery.
For more detailed insights into achieving that perfect crust every time, you might find our guide on How to Pan-Sear Scallops: Get a Golden Crust Every Time incredibly useful.
Elevating Your Seared Scallops: Finishing Touches and Serving Suggestions
With your perfectly seared scallops ready, a few finishing touches can truly elevate the dish.
Garnishes and Sauces
- Fresh Herbs: A sprinkle of chopped fresh basil, parsley, chives, or tarragon adds a burst of color and herbaceous freshness.
- Citrus Zest: A grating of lemon zest over the warm scallops brightens their flavor profile beautifully.
- Balsamic Glaze: A delicate drizzle of a good quality balsamic glaze provides a lovely sweet and tangy counterpoint to the briny scallops.
- Lemon-Garlic Butter Sauce: For an extra layer of indulgence, quickly whisk together some melted butter, minced garlic, a squeeze of lemon juice, and a pinch of red pepper flakes in the same hot pan (after removing the scallops) to create a simple, flavorful sauce to spoon over them.
Serving Suggestions
Seared scallops are incredibly versatile and pair well with a variety of sides:
- Classic Pairings: Creamy mashed potatoes, risotto (lemon or mushroom), or a simple pasta dish with olive oil and garlic.
- Vegetable Sides: Asparagus, green beans, roasted broccoli, or a light mixed green salad dressed with a vinaigrette.
- Lighter Fare: Serve alongside a grain like quinoa or farro for a wholesome meal.
- As an Appetizer: Arrange them on a platter with a dipping sauce for a sophisticated starter.
Whether anchoring a fancy dinner or providing a quick, elegant weeknight meal, the buttery texture and delicate flavor of perfectly seared scallops never disappoint. Like garlic shrimp or baked salmon, they offer that ideal balance of feeling special while being surprisingly easy to master.
Conclusion
Mastering the art of seared scallops recipe boils down to a few critical, yet simple, principles: start with high-quality, "dry" scallops, ensure they are absolutely free of moisture before cooking, use a proper high-heat pan, and exercise patience once they hit the searing-hot oil. By following these steps, you’ll consistently achieve that coveted golden-brown crust and a tender, succulent interior. Experiment with different garnishes and sides to make this versatile dish your own. So, go ahead, gather your ingredients, fire up that pan, and prepare to impress yourself and your guests with a truly restaurant-worthy plate of pan-seared scallops.
